
Because I love HSTs and you should too!
I know there are a few beginning quilters out there who follow my blog, so I thought I’d start posting some tips, tricks and beginner basics I’ve picked up along my quilting journey. And given my love for half-square triangles, I figured what better way than to start with some easy HSTs?!

Half-square triangles are one of the most basic blocks to piece together – and just as their name implies, they’re quite simply made from two triangles of contrasting fabric, sewn together to make a square. Commonly used as a base in much more elaborate blocks, they are often an essential part of the quilt building process.
There are a handful of different methods for making HSTs, depending on the quantity needed. In this post, I’ll be showing you how to make sets of two, four and eight.
For each method, you will need two squares of contrasting fabric. The size of your squares will determine the outcome of your HSTs. For each tutorial, I’m using 6.5″ squares.

To make 2 HSTs:
1. place your two squares on top of one another – right sides together.
2. draw a line from corner to corner, diagonally
3. sew a 1/4″ seam down both sides of your line (2 seams total)

4. cut along your drawn line
(1 cut total)

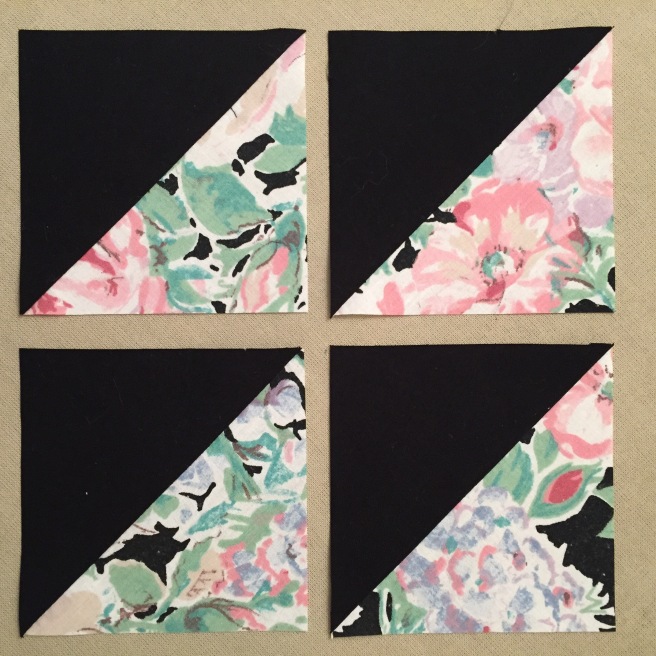
5.press the seams open toward the darker fabric and trim away the excess fabric to square up your block

To make 4 HSTs:
1. place your two squares on top of one another – right sides together.
2. draw two diagonal lines from each corner to corner – making an X
3. sew a 1/4″ seam around the perimeter of your square (1 seam total)

4. cut along your drawn lines
(2 cuts total)

5. press the seams open toward the darker fabric and trim away the excess fabric to square up your blocks
To make 8 HSTs:
1. place your two squares on top of one another – right sides together.
2. draw two diagonal lines from each corner to corner – making an X
3. sew a 1/4″ seam down both sides of each line (4 seams total)

4. cut along each of your drawn lines
5. make a vertical cut across the center
6. make a horizontal cut down the center
(4 cuts total)

7. press the seams open toward the darker fabric and trim away the excess fabric to square up your blocks

Just to show an example of one of the many ways to use half-square triangles, the Split Sawtooth Star Block below was made using one large HST for the center and ten of the smaller HSTs for the star’s eight points and two of the block’s corners (with two small contrasting squares for the other corners). Easy peasy!


Need to make more? Debbie at A Quilter’s Table has an awesome tutorial for making eighteen HSTs at a time! Go check out her tutorial for Big Batch HSTs here!
——
Does anyone know of any other methods of HST making? I’d love to hear about them!
xo.a


What does the whole quilt look like with that block
LikeLike
Okay. See if this is correct. Say we are using 10″ squares. We make the 4 hsts from each of three 10″ square which would leave 2 extra for another block. Then we make 2 hsts from the 10″ square leaving one for another block. We sew the smaller hsts together two at a time then trim the larger one so the two smaller ones will fit across. Did that make sense at all?
LikeLike
Do you mind giving the measurements for the block you just showed? Love love love how you make this seem so simple
LikeLike
Did you finish a quilt with these fabrics?! I think it’s beautiful and I’d love to see the finished result.
LikeLike
Wow Amanda. Such a good tutorial. I had no idea that you could make more than two HSTs at one time. Going to save this post!
LikeLiked by 1 person
Thank you! Isn’t it wonderful? Check the other links that were suggested in the comments for more methods! I can’t wait to try them all!
LikeLiked by 1 person
Great tips and a lovely finished block as well! I have seen another tutorial at Blossom Heart Quilts, making HSTs using a strip method eg a jelly roll
http://www.blossomheartquilts.com/2015/05/hst-tutorial-strip-method/
Hope you like it!
LikeLike
Thanks, Sue! I’ll check that one out! 😊
LikeLike
Thanks so much for this post, Amanda! I was actually just wondering how to make these. I have yet to take the plunge but I really would like to give quilting a try.
LikeLike
You’re welcome! These blocks are fun to make and they’re so easy! I made one of my first quilts from HSTs and it’s still a favorite. You should definitely give it a try. 😄
On Thu, Aug 18, 2016 at 6:56 AM, Gypsy Moon Quilt Co. wrote:
>
LikeLiked by 1 person
Oh how I love HSTs!!! These are the techniques I use as well and find I get into a groove when I’m making them and find it really relaxing. Well, except for the squaring up bit 😉
LikeLike
Aren’t they the best? I miss the days when I didn’t know you were supposed to square them up at the end. Things were so much easier. 😂
LikeLike
Thanks for sharing your tips!
LikeLike
My friend Rachel @Quiltineering hasn’t blogged recently, but she did a series of tutorials on HSTs and also included the Bias Strip and Strip Tube methods. You can see them all here: http://www.quiltineering.com/category/tutorials/
LikeLiked by 1 person
Ooh, fun! Definitely going to try some of these. Thanks for sharing, Yvonne!!
LikeLike