
I’ve gotten a few comments from people regarding my DIY header image, so I thought I’d share the process of how I made it. — I’ve also added a new Tutorials tab to my navigation bar where I will be posting more DIY projects and instructional posts in the future (much less technical ones, of course).

When I was planning my overall blog design and style, I really wanted to capture the vibe of what I envisioned my brand’s style to be. Because I use repurposed and mostly vintage materials when quilting, I wanted to create a header image that reflected this. I wanted it to feel organic and natural with an added softness to balance it out.
I looked online at hundreds of free stock photos of different wood grains, fabric textures and lace. I tried mixing and editing them in all kinds of ways, but nothing really worked for me. It all just seemed so… artificial. Which was the complete opposite of what I was going for. Luckily, I happen to consider myself to be pretty resourceful, so I decided to make my header image the old-fashioned way.
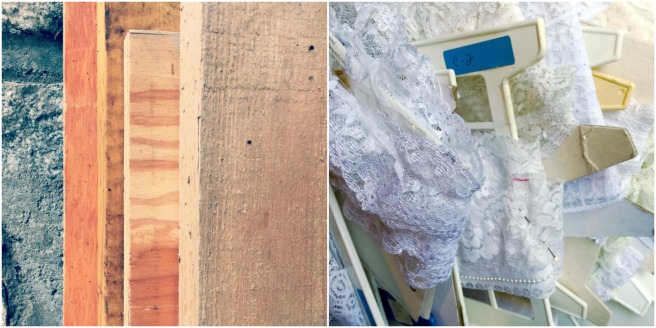
I remembered seeing a pile of old wood scraps lying around, which were perfectly weathered and exactly what I was going for. And what works even better than a computerized lace overlay? Why, the giant bag-full of vintage lace that I’ve been hoarding for a few years, of course! Did I say I was resourceful? 😉
Creating the image was incredibly simple to do, all I needed was a camera, materials and editing software.
Materials: Wood, lace – check! Clean work surface… naaah.


I played around with the lace until I was satisfied with the placement. I brought the sections a little closer together, making a frame for where I wanted the text to go.

I really loved the look of the lace, but felt the one I chose was a bit more delicate than I wanted, so I decided to go with a wider, heavier one instead.

I used PicMonkey to edit my photo. I added my text, made the temperature a little warmer and faded the image to soften it up. Then I cropped my image and voilà! A header was born.
The possibilities are endless! Here’s a look at some of the other versions I made:


Now that I’ve rediscovered my wondrous bag o’ vintage lace, I’m working on incorporating it into my future quilts and creations.
Do you have any suggestions on ways to use lace in sewing and quilting (or other) projects? I’d love to hear some ideas!
xo.a


Nice job! I do love the look. I haven’t used any lace in my quilts but I have used some doilies. Maybe some lace in the borders would look nice. Have fun playing!
LikeLike
Thanks, Melva! I love seeing the unexpected in quilts. So many possibilities!
LikeLike
Amanda, thanks for walking us through your process! I’m sure some lace would be great in baby quilts, maybe just peeking out of a few seams here or there?
LikeLike
Yes, I love that idea! So sweet!
LikeLike
Thanks for sharing your process. I’ve been playing a bit with PicMonkey and PhotoShop, as well. Love to see more of your lace!
LikeLiked by 1 person
Thanks, Marla! PicMonkey is great! I’ve been using it for several years now, but PhotoShop is fairly new to me. I’m going to take some time in the future to figure it out more.
LikeLike
I love it when a DIY works out!! Your banner is just stunning and definitely aligns with your brand – well done!!
LikeLiked by 1 person
Right? The best feeling! Thank you, Shannon!
LikeLike
Very cool! Thanks for sharing, it is an eye catcher for sure!
LikeLiked by 1 person
Thank you, Sharon!
LikeLike
Aha! That’s so simple. Love the way you’ve used the things you had on hand.
LikeLiked by 1 person
Super simple! I love when things turn out less complicated than they need to be. 😄
LikeLike
So wonderful Amanda. Thank you for walking us through how you created your image.
LikeLiked by 1 person
Thanks, lady! It was a super easy and fun project to share.
LikeLike